Set height of a minipage

The width of a minipage is a mandatory parameter. But hidden in the optional parameters is a way to set a specific height for a minipage.

The first parameter is the position of the minipage relative to the baseline. Possible values are ‘t’ (top of the minipage is level with the line), ‘c’ (center of the minipage is level with the line) or ‘b’ (bottom of the minipage is level with the line).

The second parameter is the height. The minipage will have exactly this height. If the text inside the minipage is longer, it will spill out of the box, the height is not adjusted. If the text is shorter, the remainder of the box will be empty.

The last parameter is the vertical position of the text inside the minibox. Possible values are ‘t’ (top-aligned), ‘c’ (centered), and ‘b’ (bottom-aligned).

\begin{minipage}[t][5cm][t]{0.5\textwidth}
test
\end{minipage}

LaTeX a5 paper size

In theory, the option ‘a5paper’ should give you a page of A5. Unfortunately, this option only sets the are in which LaTeX typesets, not the physical output pdf size. You need to load the ‘geometry’ packet to achieve this:

\documentclass[a5paper]{scrartcl}
\usepackage[pass]{geometry}

LaTeX citations as used in the NLP community

If you read NLP literature, you will find literature refernces of the form “The first work on this task was done by Smith and Miller (2006). Similar techniques are used in information retrieval (Doe and Norman, 2010).”

This is quite different from what LaTeX usually provides – numbered citations like [1] with ‘plain’ or cryptic letter-number combinations like [SM06] with ‘alpha’. The closest you can get out of the box is ‘apalike’ which would give you [Smith and Miller, 2006].

So what to do?

1. Option: Use a bibliography style provided by some NLP conference, e.g., from NAACL 2013. They will generally offer \newcite to get Smith and Miller (2006) and \cite to get (Doe and Norman, 2010).

2. Option: Use natbib which offers \cite to get Smith and Miller (2006) and \citep to get (Doe and Norman, 2010). Additionally, natbib can do much more, e.g., you can add text into the parenthesis.

Minimal example:

\documentclass[a4paper]{scrartcl}
\usepackage{natbib}
\bibliographystyle{apalike}
\begin{document}
The first work on this task was done by \cite{SmithMiller2006}.
Similar techniques are used in information retrieval \citep{DoeNorman2010}.
\bibliography{literatur}
\end{document}

So, why not use both, some aclstyle and natbib together? Well… they are not compatible (or at least I was not able to make it work).

Precision-Recall-Curves and Mean Average Precision

Precision-recall curves are often used to evaluate ranked results of an information retrieval system (e.g., a search engine). The principle is easy, for every search result, check the precision and recall you have until now (precision/recall at k). If you plot this in a graph with recall on the x-axis and precision on the y-axis, you end up with something like this (blue line):

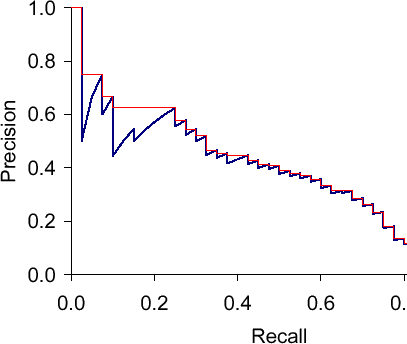
The essential shape is always the same. Why? Let’s say we have looked at k results which corresponds to a point with a precision and a recall value. What can happen when we go to result k+1? The result can be correct, then recall will increase and precision as well – the curve goes up and right. Or it can go wrong, then recall stays the same and precision drops – the curve goes straight down.

The red line is the interpolated precision, meaning we define precision at some arbitrary level to be the maximum precision reached at any later recall level. Essentially, we flatten the "teeth" of the curve. The difference can be pretty big (see in the plot at recall around 0.2), we can even "skip" a tooth.

What would the curve look like for a perfect system? Meaning a system that only returns correct results? It would be 1.0 for every recall level. A system that never returns a correct result? 0 for every recall level.

What should the value be for precision at recall 0? If we interpolate, the answer is clear: the highest precision value at some later recall level. This does not have to be 1.0 – it could happen that the first result is wrong, the second correct, then we have P=0.5 at k=2 and it might only drop from there.


Sancho McCann. It’s a bird… it’s a plane… it depends on your classifier threshold. 2011.
Christopher D. Manning, Prabhakar Raghavan and Hinrich Schütze. Introduction to Information Retrieval. Cambridge University Press, 2008. (Chapter 8)

CV in LaTeX with moderncv

It’s easy:

\documentclass[11pt,a4paper]{moderncv}
[...] % load your usual packages

% moderncv themes
\moderncvcolor{grey} % color options 'blue' (default), 'orange', 'green', 'red', 'purple', 'grey' and 'black'
\moderncvstyle{casual} % style options are 'casual' (default), 'classic', 'oldstyle' and 'banking'

% Your contact data
\firstname{Max}
\familyname{Mustermann}
\address{Thisstreet 1}{12345 Exampleville}
\phone{ (01\,23)~45\,67\,89\,00}  
\email{me@myself.de}    
\photo[64pt]{myself}

\begin{document}
\maketitle

\section{Education}
\cventry{year--year}{Degree}{Institution}{City}{\textit{Grade}}{Description}
[...]
\end{document}

I had the problem that when you specify months and years instead of only years, the left margin is too small. You can adjust that with these two lines:

\setlength{\hintscolumnwidth}{0.25\textwidth}
\AtBeginDocument{\recomputelengths}

Also, the languages take up a lot of space, you can just put it into two columns to save space. This is better than the cvdoubleitem in my opinion, because you are more flexible to change the order. I suppose you can still add the comment, if you need to, try it out.

\begin{multicols}{2}
\cvitem{Language 1}{Skill level}
[...]
\end{multicols}

Sorting a HashMap by Value in Java

Sometimes Java drives you nuts… you want to save word bigrams and their frequencies as an example. A HashMap<String, Integer> is very convenient. Now we want to sort it by value. And the fun begins! Of course we do not want to lose the connection between keys and values, so we cannot just use Collections.sort(map.keySet()) (or the same for values). Also using a TreeMap with a custom-wrote Comparator for our pairs does not work, because there you cannot have identical values (another fun fact).

Here is a generic method that sorts the given HashMap by value. V can be anything as long as it can be compared with itself.

public static <K, V extends Comparable<V>> List<Entry<K, V>> sortHashMapByValue (HashMap<K, V> theMap) {
   List<Entry<K, V>> resultList = new ArrayList<Entry<K, V>>(theMap.entrySet());
   Collections.sort(resultList,
          new Comparator<Entry<K, V>>() {
            @Override
            public int compare(Entry<K, V> o1, Entry<K, V> o2) {
               return o1.getValue().compareTo(o2.getValue());
            }
       });
   return resultList;

Letters in LaTeX

My standard letter in LaTeX with the class scrlttr2 (created by a German to adhere to German letter guidelines):

\documentclass[fromalign=location, fromphone=true, fromemail=true, locfield=wide]{scrlttr2}
\usepackage[utf8]{inputenc}
\usepackage[T1]{fontenc}
\setkomavar{fromname}{Max Mustermann}
\setkomavar{fromaddress}{Musterstr.\ 1\\12345 Musterstadt}
\setkomavar{fromphone}{01234/56789000}
\setkomavar{fromemail}{mustermx@provider.xy}
\setkomavar{signature}{Max Mustermann}
\setkomavar{subject}[]{}
\setkomavar{date}{7.\ August 2013}

\begin{document}
\begin{letter}{Jane Doe\\
Example street 2\\
54321 Exampleville
}
\opening{Dear Mrs.\ X,}
this is the letter I promised.
\closing{Kind regards,}
\end{letter}
\end{document}

The variables ‘from…’ set the sender, the recipient is given right after begin letter. The sender information can be set at strange places, for a very simple letter I use ‘fromalign=location’ which results in the sender information somewhere at the top right, a bit higher than the recipient, but not in the headline. With the standard settings the e-mail address is too wide for the sender field, so I widen it with ‘locfield=wide’.

Get folder/filename from a path

Get folder name, filename, file extension from a path:


# File name: Strip from start longest match of [*/]
FILENAME="${BASEFILE##*/}"
echo "FILENAME $FILENAME"

# Folder: Substring from 0 to start of filename
FOLDER="${BASEFILE:0:${#BASEFILE} - ${#FILENAME} - 1}"
echo "FOLDER $FOLDER"

# File prefix: Strip from end longest match of [dot plus at least one non-dot char]
FILEPREFIX="${FILENAME%.[^.]*}"
echo "FILEPREFIX $FILEPREFIX"

# File extension: Strip from start shortest match of [at least one non-dot char plus dot]
EXTENSION="${FILENAME##[^.]*.}"
echo "EXTENSION $EXTENSION"

Amazon Review Downloader

If you do sentiment analysis on document level, there are huge amounts of data annotated with star-ratings available on Amazon and similar pages. In theory. In practice, to get this data, you need to crawl Amazon pages, download the reviews and parse the HTML to extract the individual reviews. And this would be the n-th time somebody wrote a script to do that. So, to save you the waste of time, Andrea Esuli kindly offers some scripts to download Amazon reviews and convert them to a csv file. Thank you! You can find it on Andrea Esuli’s web page.

Ugly LaTeX

How to make your LaTeX document look ugly. More specific: The request is to use Arial, 12pt, 1.5 line spacing. Looks very ugly but here it is:

\documentclass[12pt]{scrartcl} % use 12pt
[...]
\usepackage{setspace} % manipulate line spacing
\renewcommand{\rmdefault}{phv} % Arial for serif typeface (normal text)
\renewcommand{\sfdefault}{phv} % Arial for sans-serif (headings)
[...]
\begin{document}
[...]
\onehalfspacing % use 1.5 line spacing
[...]